Savvy Search Our Blog

Monday, January 21, 2013

Super Bowl Bingo

Pin It

As promised, here is my Super Bowl BINGO. Click here to download the PDF file. You could also use a football themed paper or plain cardstock.

I give each guest 1 sheet, which has 2 printed BINGO cards—double the cards, double the fun. You could also cut each sheet into half and give each player 1 card.

To play, participants watch the game and look for the items on their BINGO card. If there is a dispute about whether something “counts”, you may resolve the issue with either a majority-rules vote or designate someone as the BINGO referee before the game starts.

We offer multiple winning options. We play 4 types of BINGO simultaneously: traditional BINGO, all 4 corners on one card, two diagonals on the same card to form a big X, and covering every square on one card. The first person to accomplish any of the 4 types of BINGO wins that prize. Play continues until all 4 BINGO types have been won. We keep a large dry erase board next to the screen and circle each game as it is won.

My daughter serves as the BINGO master.  She keeps up with marking-off finished games and handing out prizes.  This gives her something fun to do, as she is not really interested in the game.  I give her a whistle to blow when a successful BINGO is called and an official BINGO Master hat to wear.  She is not responsible for settling disputes, as grown adults get very passionate about this game and she is still a little girl. 

Monday, November 12, 2012

Angry Bird parties 1.0 and 2.0!


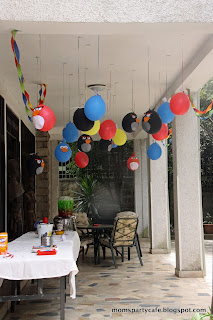
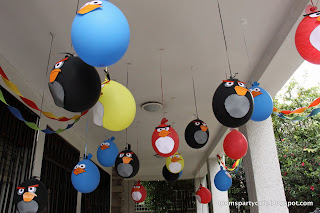
We (DH and I) survived 2 weeks in a row of birthday parties.  We debated whether or not to do 2 parties, or one HUGE party.  We figure, this may be the last time we do the "invite-the-entire-class" party, so the thought of having over 40 kids (because overseas, regardless of instructions, everyone brings a sibling/cousin/friend) was VERY overwhelming.  So, we opted to throw 2 separate parties, two weeks in a row.  But, I can't really complain, because, they chose the same theme, so we just did a repeat!  Thanks to all the parents who stayed behind to help!  The result was 2 very successful parties and 2 VERY happy little boys!

(and apologies for the smudge in the pics!  A new camera has since been purchased!)

Angry printables were found here:  Angry Bird Poop, All other printables

Let us know if you have any questions...feel free to Pin away!

Decorations and favors:

See the printable links above...just fill with m&ms.  We used plain, peanut, and peanut butter filled ones!
Our favor bags...if I could have found them, I would have used the different colored ones.  How cute would that have been?  Trials of living in Africa!


The snacks/food:
By far the hit of the party...a great video tutorial can be found at The Sisters Cafe.  I didn't do the third layer because it calls for diet soda.  I don't like to think of myself as an "uber-mom" but the thought of serving diet soda to children for aesthetic purposes didn't jive (off my soap box).  I used juice and gatorade. 

 
I would recommend using a color printer for the signs....guess what died about 2 weeks before our parties?


The hit of the party!  The sling shot!

I keep getting asked, and the answer is YES!  I did hand paint all the balls!  The paint didn't last long, but the kids had fun, and that's all that matters.


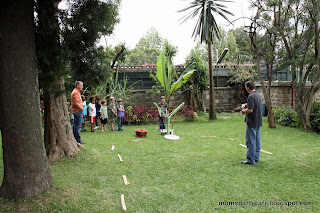
Rules being explained...notice the "zone of safety" outlined by the firewood!

One of the balls decided to join the real birds

P.S. I've debated whether or not to put up photos for the cakes, for fear they will end up on Cake Wrecks, but here goes nothing...(go ahead and boost my ego...tell me they're great LOL)

And the cakes...YIKES: 


And of course, the parents had to have a go: 


Friday, September 28, 2012

Angry Bird Party...PREVIEW!


So the boys want a Angry Bird Party...how do you do that in Africa?  Well, with a lot of on-line shopping, but most importantly CREATIVITY!  The parties are coming up in the next couple of weeks.  The good news about having kids who are only 2 years and 2 weeks apart, they usually agree on the same theme (so far at least) and I just plan for a few weeks, and then I'm done for about 48 weeks :)!

Jo and I have been lacking in our posting, but we know you are all out there.  We hate to say "we're busy" because we know that all of you are, too.  I want to post some previews (since we've been planning for about a month).  I will post the entire party in a few weeks.

Be patient with me, our baby brother is getting married in about a month.  So I have 2 parties to throw (and maybe a third...can we say an "Adult Only Angry Bird Party"...) and then I have to get my family of 4 back to the States.  Hopefully I will be on top of things, but for sure will try and plan to post before Thanksgiving?

Remember, this is just a preview!  Don't forget to pin us and send people our way!

First we painted some dodge balls:


Then we built a sling shot...we had to test it...


We made cake pops for the class (I used these instructions from  Divas Can Cook)...


And lastly, we had to try the layered punch (I've been dying to try this).  Just use different drinks with varying sugar contents.  I used CranApple Juice (32 grams of sugar) and G2 Gatorade (15 grams of sugar).  Make sure the glass has A LOT of ice.  Pour the different layers VERY slowly over the ice.  If you want a third layer, add a diet drink (0 grams of sugar) last.  I think I'm going to avoid this.  I'm not sure why (maybe I still hear mom's voice in my head) but I don't think kids should drink diet soda.  For the party I'm going to fill my big punch/beverage dispenser, but thought I would try the glasses first:


Sunday, May 20, 2012

End of the year - teacher gifts - Candy Bowl!


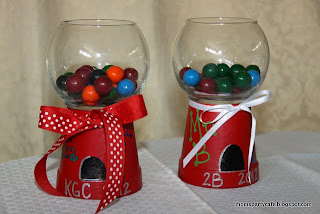
It's that time of year again, to think of teacher gifts.  As Jo's kids are finishing up, we still have 3 more weeks left here...sigh!  This weekend my boys and I worked hard to make up the gifts so I'm not doing last minute scrambling.  This year, I decided to bring back an oldie, but goodie.  Jo and I used to make these up by the dozen and sell them at craft fairs, over 10 years ago...Jo, how is that possible?  These are SUPER easy to make, and the best part is that you can make them your own, and personalize as you like (and it's dirt cheap if you use the below links)!  The sky is the limit....

Yes...I had to make FIVE!
What you need:

  • 4" craft pots or flower pots....(I ordered a dozen from Oriental Trading, and they got here, Africa, all in one piece)
  • Glass bowls (I got these for a STEAL of a deal from the DollarTree...again, all in one piece)
  • Paint (if I could, I would have used spray paint, but craft acrylic worked just fine...Jo, didn't we use to spray paint them?)
  • Paint pens
  • Glue (As you will see in the photo, I didn't know what glue would work best...turns out the Tacky Glue worked famously!)
  • Ribbon
  • Optional, but SUPER cute:  I couldn't figure out how to send them here, but if you can find flower pot saucers that match your 4" pot, glue a wooden ball to the bottom, paint them the same color as the pot, and you have a lid to your candy dish...how I wish I had them this year!

Directions:
  • Paint the flower pot the color of choice.  If you want them to look like an old fashion gum ball machine, red is the way to go.  But, as we were painting, I thought chalk board paint could be fun, too.  Keep in mind, with red paint, you will need many coats to be even.  I lost count at 4 :)!  The good news about the Oriental Trading pots, is that the paint dries super fast, which means, if you have 2 (or more) little helpers, you will need to keep an eye on their painting, to ensure there are not paint bumps.  This is why spray painting them, may be better...Let us know if you spray paint, and how it comes out :)!  
  • Then decorate as you like (minus the ribbon, do this last).  I used a black sharpie for the "dispenser" and highlighted it with a silver paint pen.  I then used paint pens to write the teacher's names, school name, and class/year.  
  • Glue the glass bowl to the top of the pot.  
  • Tie your favorite ribbon around the top of the pot, under the bowl.
  • Fill with your favorite candy!  (I did choose the obvious "gum balls,"  but that's because many of our teachers are not American and I thought it would be fun to give them something "Americana.")
Savvy Tip:  Glue the bowl after you decorate the pots.  It's easier to handle.

The one with a white ribbon, is for my son's male teacher's aid...My son said the polka dot ribbon was "too girly."


Related Posts Plugin for WordPress, Blogger...